Get Token
This document describes how to obtain access_token, id_token and refresh_token based on the OIDC standard, as well as the meaning and usage scenarios of these "tokens". If you need to use your own login page, please refer to the documentation in the login section.
1. What is "based on the OIDC standard protocol"?
Using this method, the end user will be redirected to your online login page hosted by GenAuth through a browser 302 redirect for authentication. After the authentication is completed, it will call back to your application system, and depending on the authorization mode you choose (see below), it will carry credentials in the browser address bar, which you can use to obtain the user's id_token, access_token and refresh_token. As shown below:
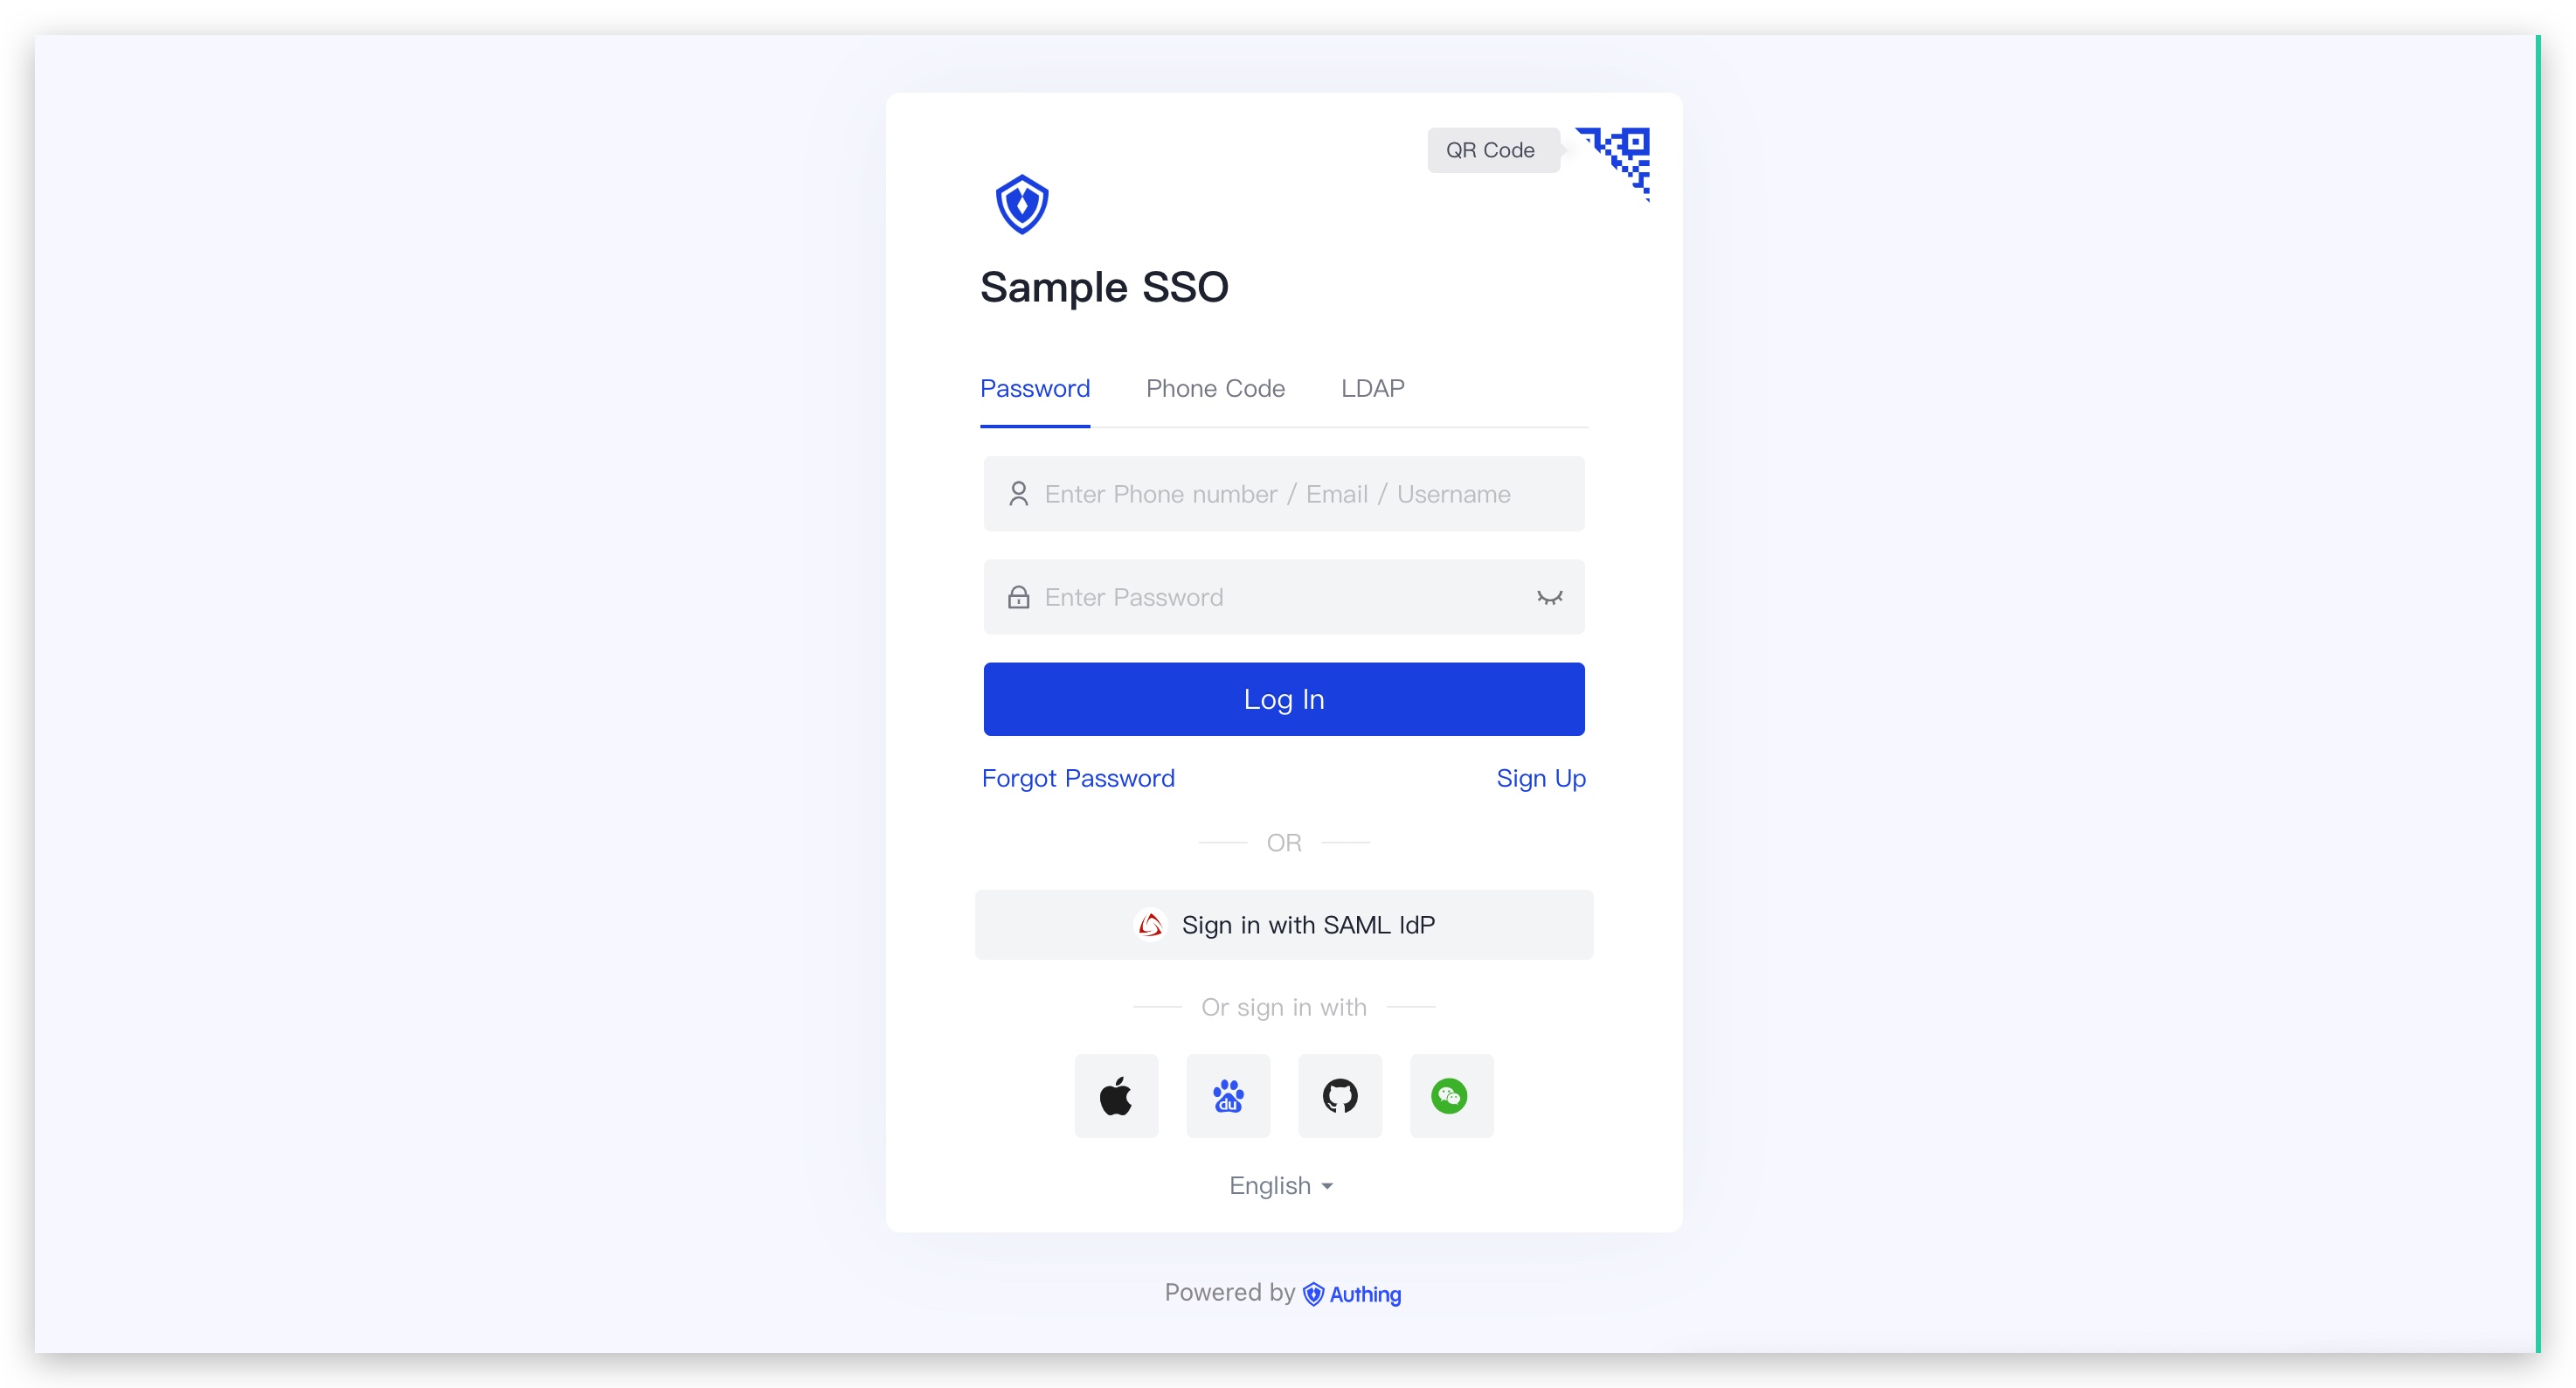
The GenAuth hosted login page is the simplest and most secure integration method. This is because the login process is maintained by GenAuth and kept secure by GenAuth. For most integrations, it is recommended to use the login process hosted by GenAuth. Your business system redirects the user to GenAuth, where the user authenticates and then redirects back to the application callback connection configured in the console. This design is considered a security best practice. In terms of custom configuration, the hosted mode provides a moderate degree of login registration form customization, which can be customized through console configuration and CSS. Click here to experience it online.
2. Click to expand the detailed introduction of access_token, id_token and refresh_token
What is ID Token?
The most important extension of the OpenID Connect (OIDC) protocol to the OAuth 2.0 protocol is the ID Token data structure. After a user is authenticated by OIDC, he can get his ID Token, which is equivalent to the user's identity credential, which you can think of as his ID card.
ID Token is essentially a JSON Web Token (JWT), so you can easily get the user's user information, and the JWT mechanism also ensures that the content of the ID Token will not be maliciously forged or tampered with by others. If you want to know more about JWT, you can read Understanding the Interpretation and Use of JWT Token.
ID Token The example is as follows:
eyJ0eXAiOiJKV1QiLCJhbGciOiJIUzI1NiJ9.eyJzdWIiOiI2MmVhYTk1ZmNhMWM1OTZjNTk5YjY3OWYiLCJhdWQiOiI2MmY3MzNhNzE0OGJmOTU4YWYxZTU0MTAiLCJpYXQiOjE2NjA4MDE1MjEsImV4cCI6MTY2MjAxMTEyMSwiaXNzIjoiaHR0cHM6Ly9zYWRkZGYuY2o ubWVyZWl0aC5jb20vb2lkYyIsIm5vbmNlIjoiVGpESkRUaFcwaCIsIm5hbWUiOm51bGwsImdpdmVuX25hbWUiOm51bGwsIm1pZGRsZV9uYW1 lIjpudWxsLCJmYW1pbHlfbmFtZSI6bnVsbCwibmlja25hbWUiOm51bGwsInByZWZlcnJlZF91c2VybmFtZSI6bnVsbCwicHJvZmlsZSI6bnV sbCwicGljdHVyZSI6Imh0dHBzOi8vZmlsZXMuYXV0aGluZy5jby9hdXRoaW5nLWNvbnNvbGUvZGVmYXVsdC11c2VyLWF2YXRhci5wbmciLC J3ZWJzaXRlIjpudWxsLCJiaXJ0aGRhdGUiOm51bGwsImdlbmRlciI6IlUiLCJ6b25laW5mbyI6bnVsbCwibG9jYWxlIjpudWxsLCJ1cGRhdG VkX2F0IjoiMjAyMi0wOC0xN1QwNjozNToyOC4zNzZaIiwiZW1haWwiOm51bGwsImVtYWlsX3ZlcmlmaWVkIjpmYWxzZSwicGhvbmVfbnVtYmVyIjpudWxsLCJwaG9uZV9udW1iZXJfdmVyaWZpZWQiOmZhbHNlfQ.KDCWkSCxek_-fuRzH7kq8lU_NYMYZKns4gquUoyosi0This is a Base64 encoded (non-encrypted) string, you can easily decode and verify its content through various language clients:
{
  "sub": "user_id",
  "aud": "app_id",
  "iat": 1660211717,
  "exp": 1661421317,
  "iss": "https://your_domain.genauth.ai/oidc",
  "nonce": "r7HSS7s_HW",
  "name": null,
  "given_name": null,
  "middle_name": null,
  "family_name": null,
  "nickname": null,
  "preferred_username": null,
  "profile": null,
  "picture": "https://files.authing.co/authing-console/default-user-avatar.png",
  "website": null,
  "birthdate": null,
  "gender": "U",
  "zoneinfo": null,
  "locale": null,
  "updated_at": "2022-08-11T09:55:15.267Z",
  "email": "test@example.com",
  "email_verified": false,
  "phone_number": null,
  "phone_number_verified": false
}
There are several important fields:
sub: User IDaud: GenAuth application IDiss: OIDC Issuer that issued this Token
(other user information).
**With id_token, you can know the user's identity (sub), and thus associate it with the business data in your business system; you can also display it based on the user's profile. **
What is Access Token?
access_token is the user's credential for accessing backend resources. When requesting the backend server, you should carry access_token (not id_token) in the authorization request header. Take CURL as an example:
$ curl -i --request GET \\
--url http://localhost:5000/api/protected \\
--header 'Authorization: Bearer eyJhbGciOiJSUzI1NiIsInR5cCI6IkpXVCIsImtpZCI6IlRmTE90M0xibjhfYThwUk11ZXNzYW1xai1vM0RCQ3MxL W93SExRLVZNcVEifQ.eyJqdGkiOiJTUWxFSGRzTk54MDc4TThwT1R6djMiLCJpYXQiOjE2MTk1MzA4MzQsImV4cCI6 MTYxOTUzNDQzNCwic2NvcGUiOiJvcGVuaWQiLCJpc3MiOiJodHRwczovL29pZGMxLmF1dGhpbmcuY24vb2lkYyIsIm F1ZCI6IjYwNTA3NTFhZWQwZjI5YmY3NzIzYzdhOCIsImF6cCI6IjVmMTdhNTI5ZjY0ZmIwMDliNzk0YTJmZiJ9.Qst hJdDM5TNtfQOAzy6EwuedK9r03SzkgE2GQkQCLv8SZJhg-tOIKzHqjDDUmRTkJPLl3HHQTUAzfS3UUYwOiah3smiYF 7ynx6jukaoGyHTIgXXwavUVmD5j-mnD3kZrLAo-dh5BLBQfLiiE_WlOkQvnKC160K9ETuwQlhx1TGJts0-sMsjsiRx 28EJvdrdWw8CVHGiQVzvCE6kHkYmkO6VTkgEnHNqpRpdB0IysIeKUOWezgGZE-Dmtyam6c8nXW_lr798B194zVyjSOuwGt1tqEfRpBDYiD_ER29aWjH2UbI0pjko_15Ldqno9RgehTJXv5suQ6zdfrER-6b5Bmg'
access_token has a certain validity period. When access_token expires, you need to use refresh_token to exchange for a new access_token.
What is Refresh Token?
A refresh_token is a special token used to obtain a new access_token. Each time you exchange a new access_token, you will get a new refresh_token again. Your system should store the refresh_token securely, because the refresh_token allows users to stay logged in for a relatively long period of time.
If you want to get a refresh_token, when you [initiate OIDC login](#tag/login/jump to%20Authing%20login), you need to add offline_access to scope.
:::
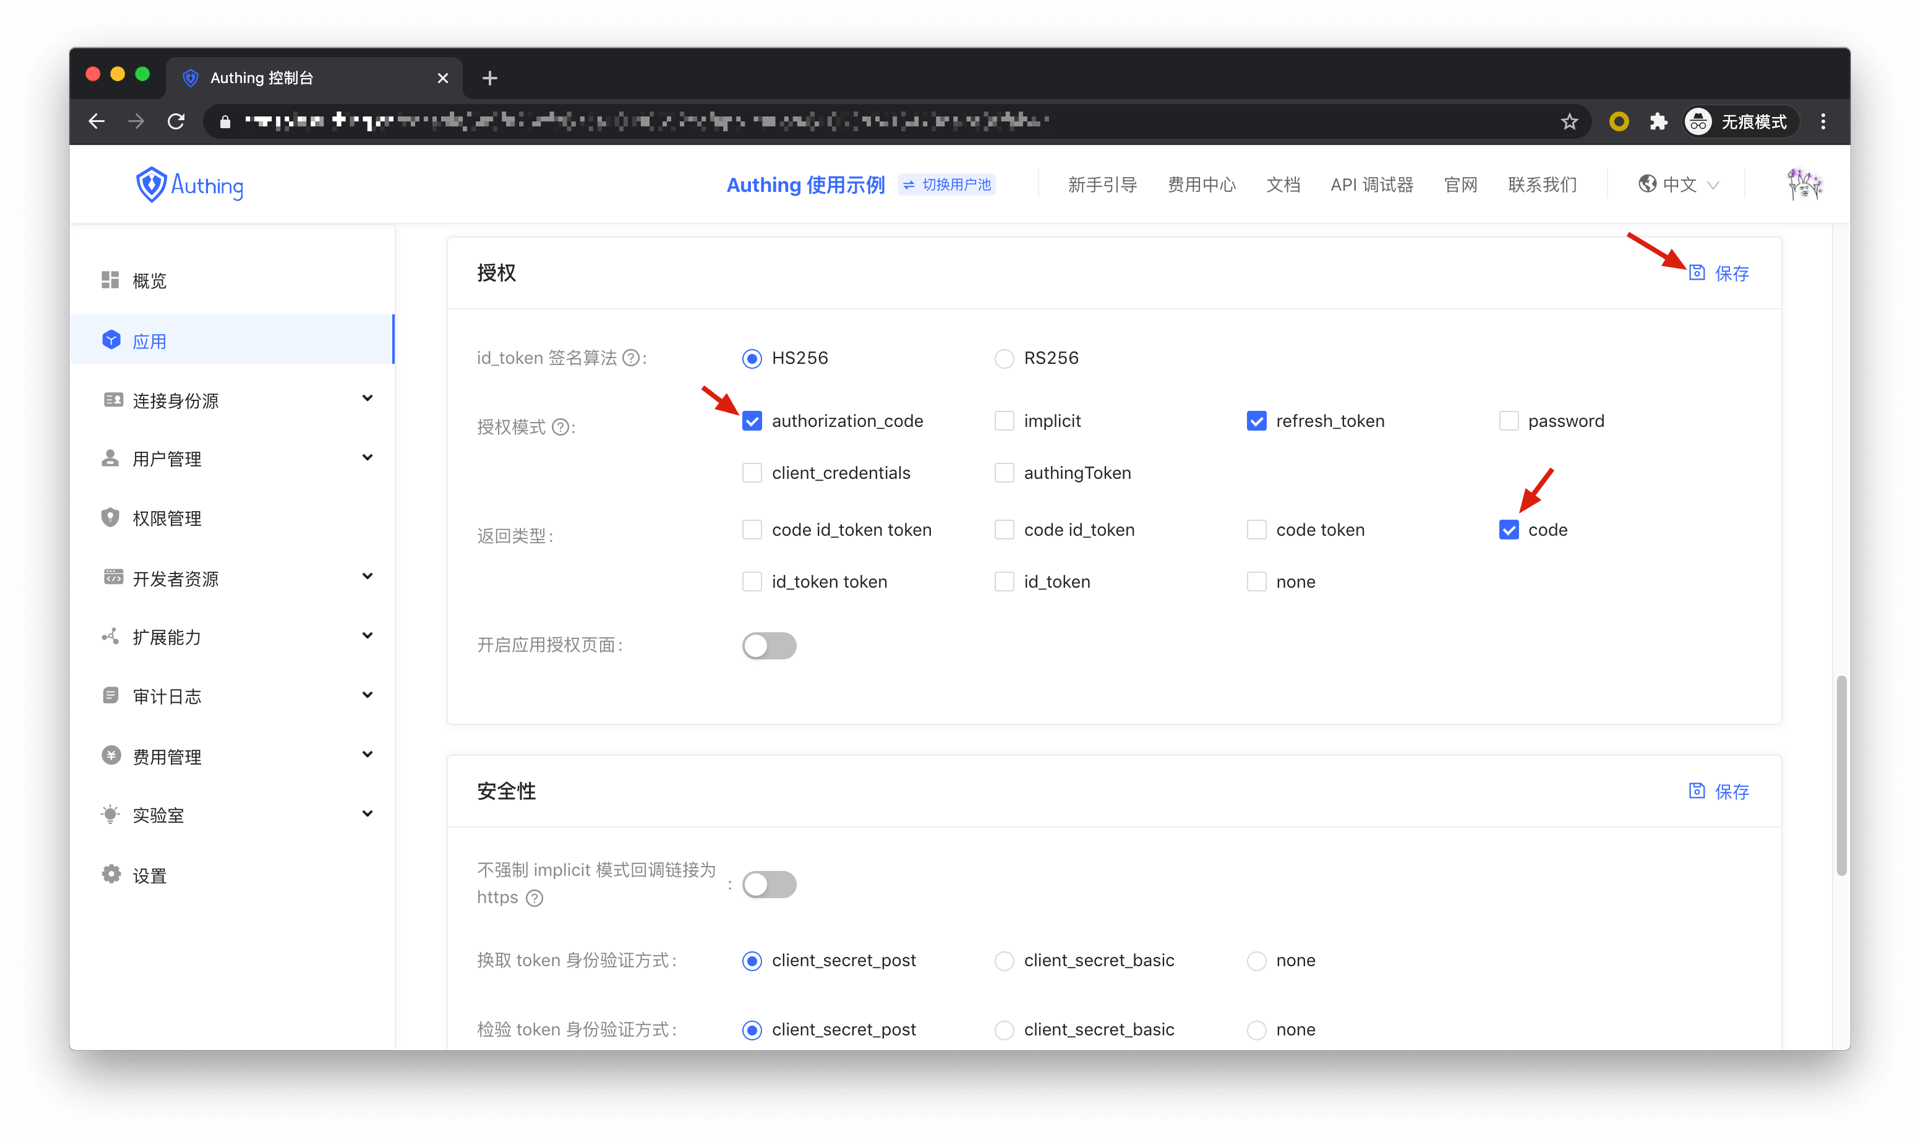
3. The token issued by GenAuth follows the specifications of the OIDC standard protocol. Depending on the specific usage scenario, you need to first select the appropriate authorization mode. Different authorization modes have different methods for obtaining tokens. Click here to expand the details.
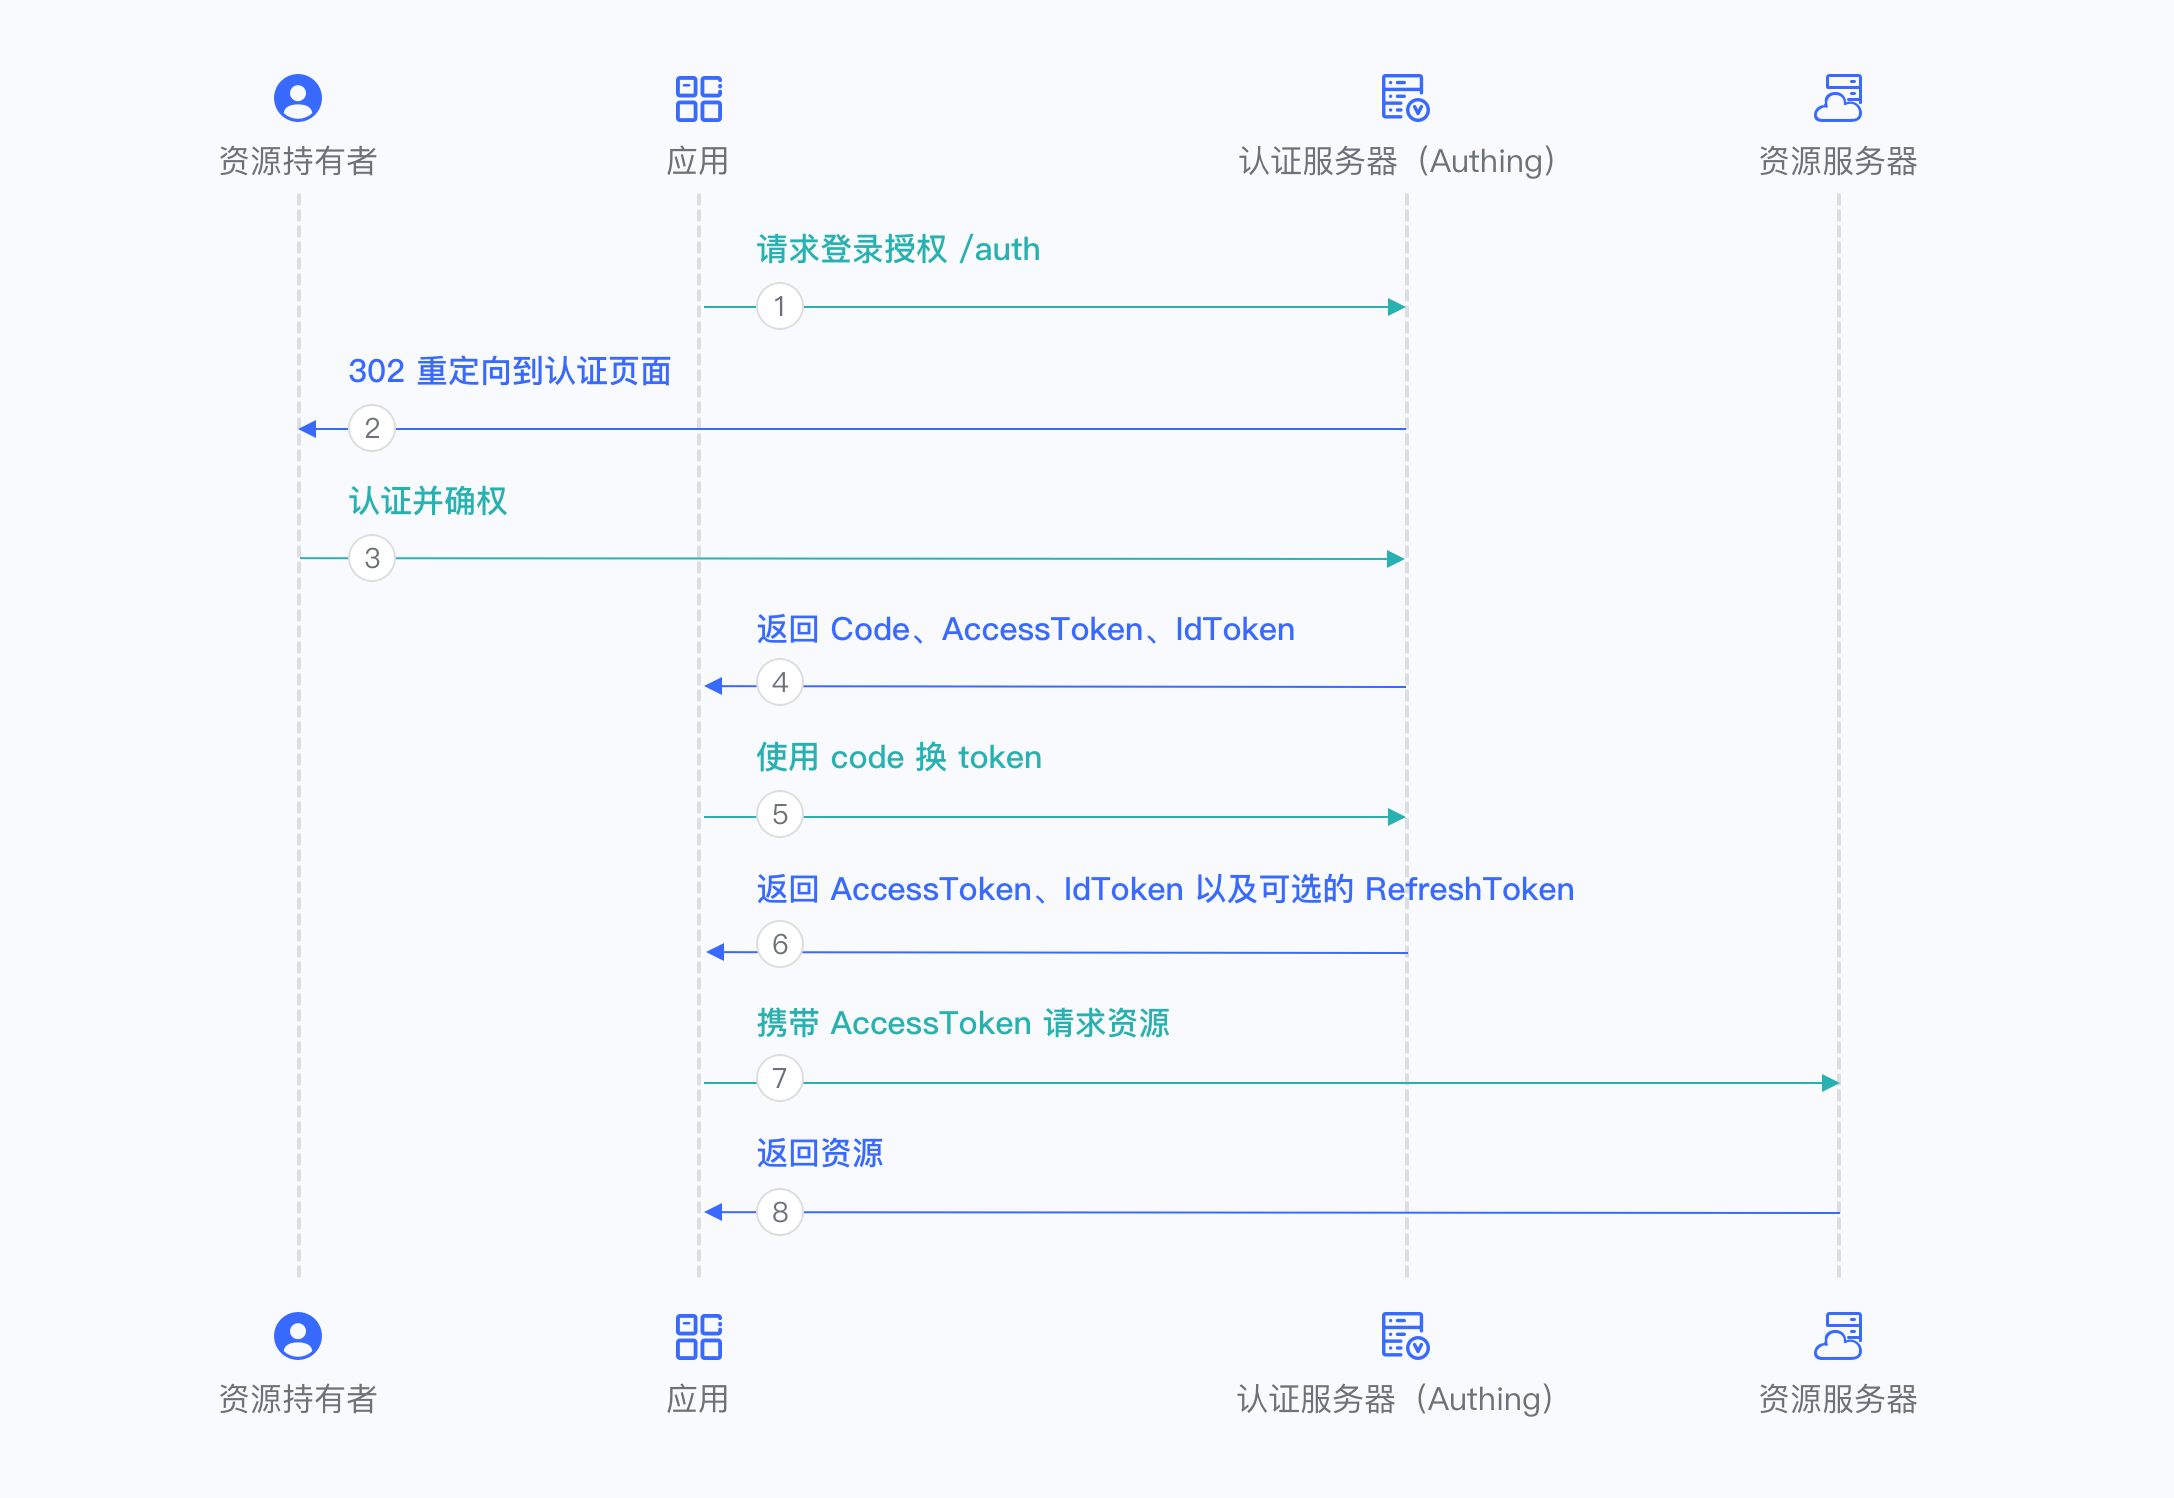
Authorization code mode
If the authentication process in your application requires the participation of the backend service, it is recommended to use the authorization code mode.
The overall process is as follows:
In your application, let the user visit the login link, the browser jumps to GenAuth, and the user completes the authentication in GenAuth.
The GenAuth server will issue a temporary authorization code and send the authorization code to your application backend through browser redirection.
Your application service backend sends the obtained authorization code to the GenAuth server, obtains AccessToken and IdToken, and returns Refresh Token if necessary.
Your application backend can now know the user's identity through IdToken, and can save user session information later. And you can redirect to other front-end pages, use AccessToken to call your backend API, etc.
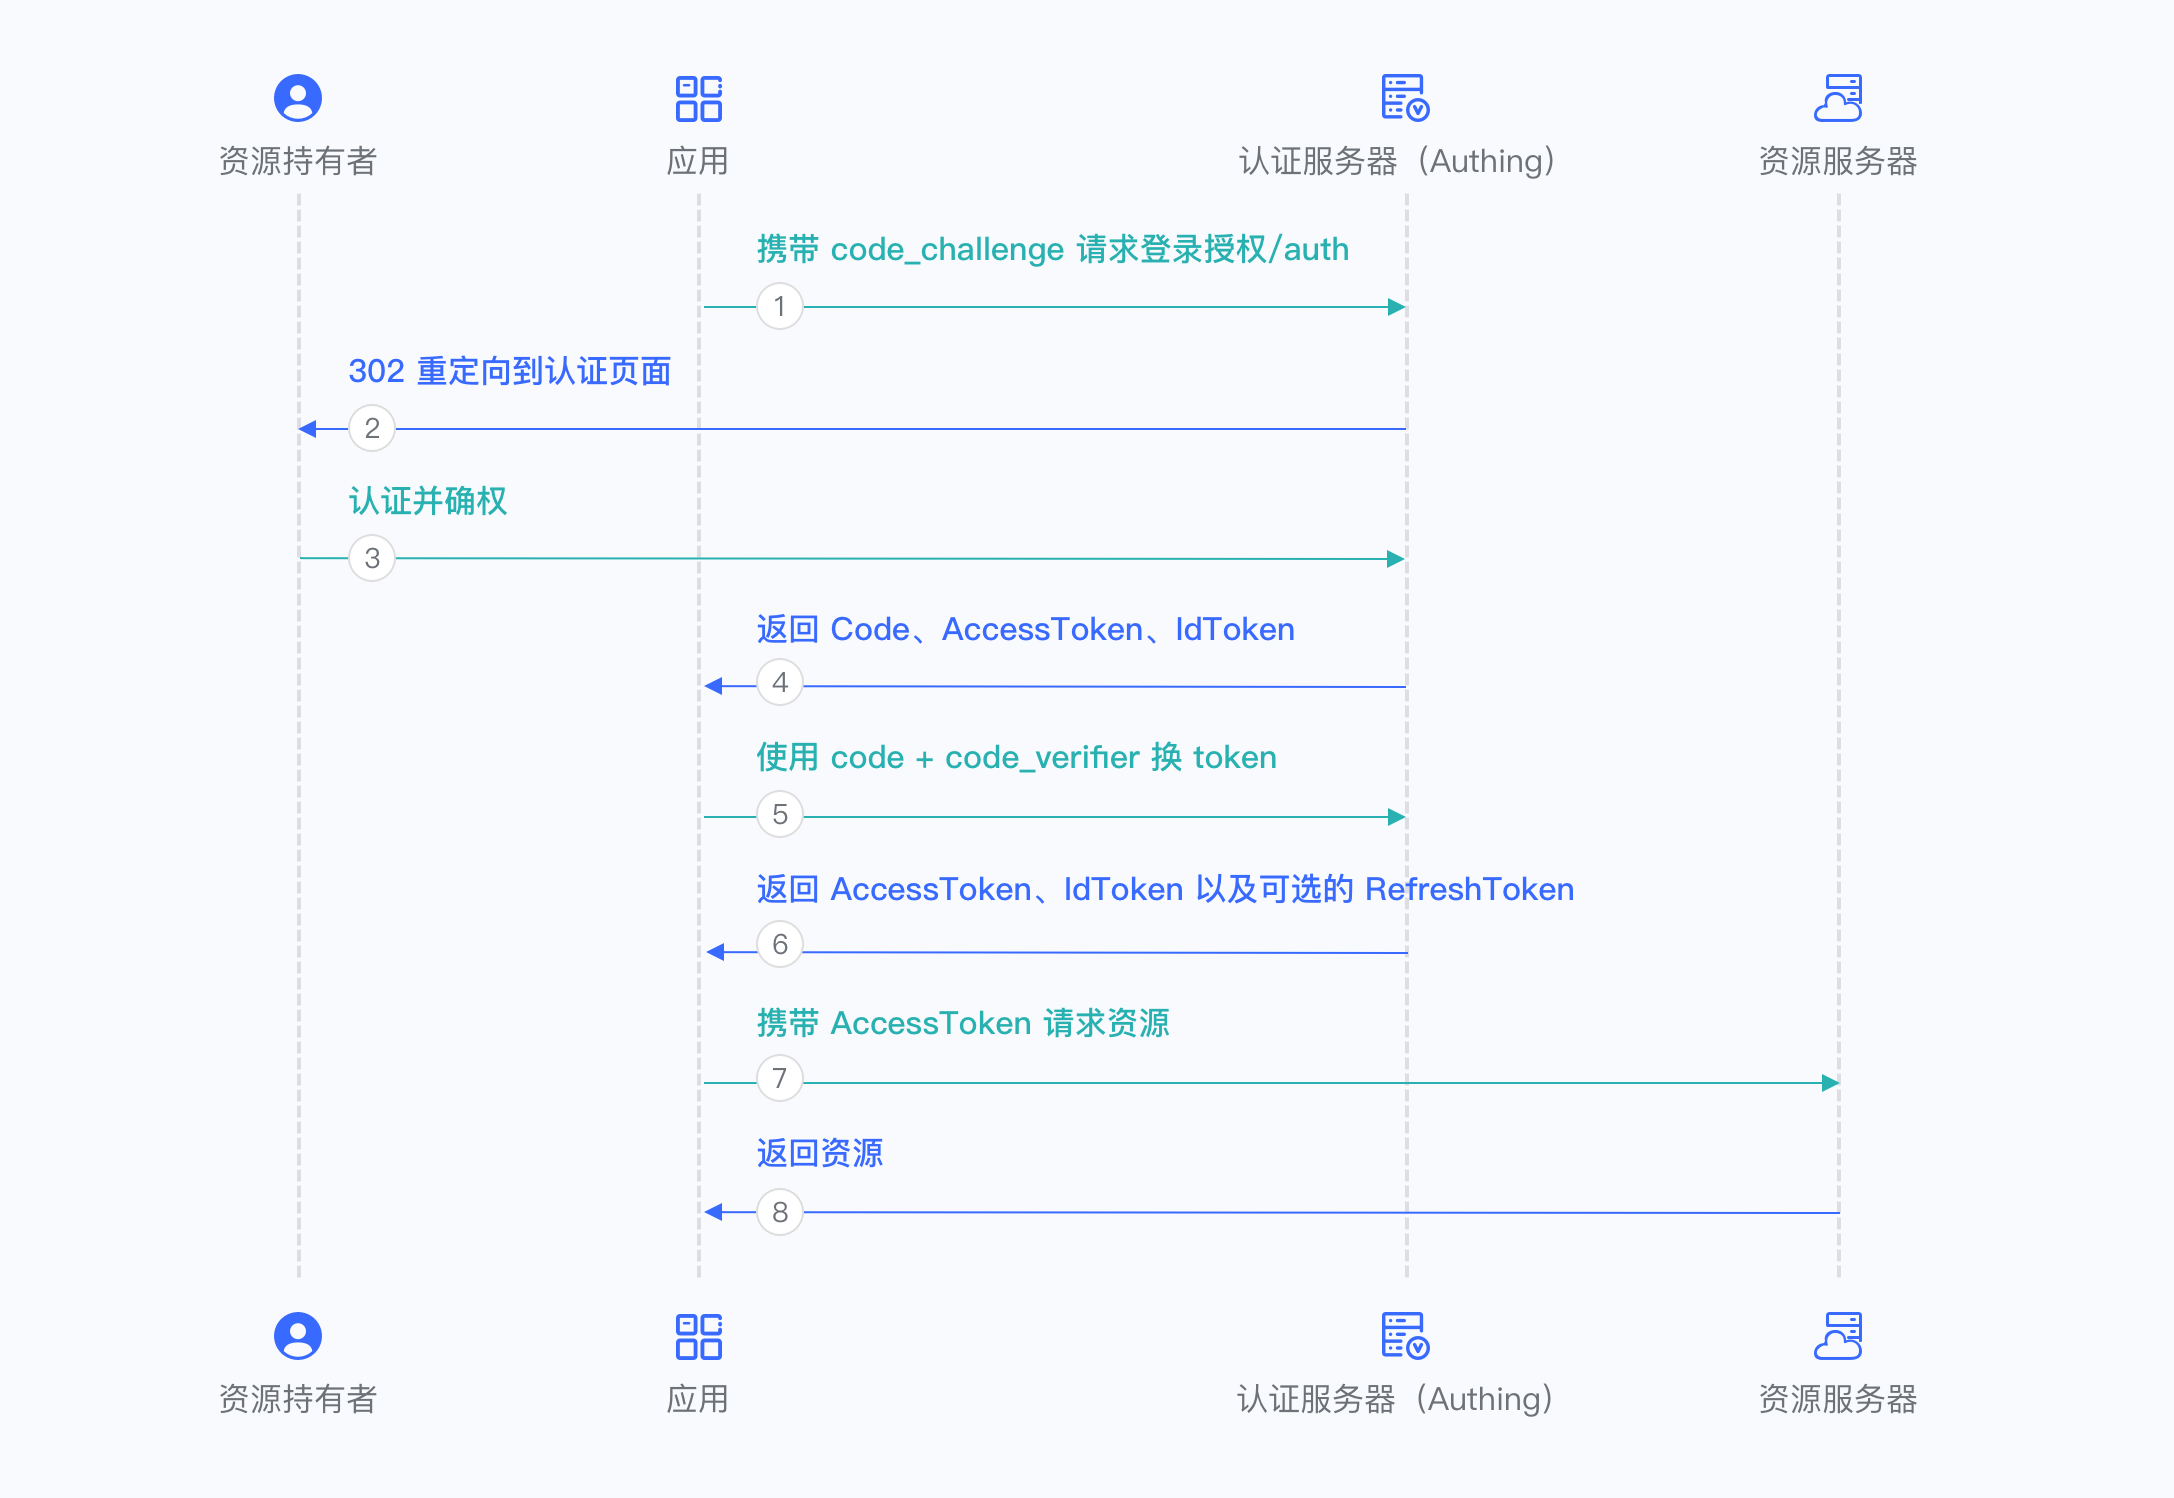
Authorization code + PKCE mode
If your application is a SPA front-end application or mobile app, it is recommended to use the Authorization code + PKCE mode. The authorization code + PKCE mode is suitable for scenarios where keys cannot be stored securely (such as front-end browsers).
The overall process is as follows:
In your application, let the user visit the login link, the browser jumps to GenAuth, and the user completes authentication in GenAuth.
The GenAuth server will issue a temporary Authorization code and send the authorization code to your application front end through browser redirection.
Your application sends the Authorization code and Verification code to GenAuth to obtain AccessToken and IdToken, and if necessary, it will also return Refresh token.
Your application front-end now knows the user's identity through IdToken. You can then use Access token to exchange for user information, redirect to other front-end pages, and use AccessToken to call your back-end API.
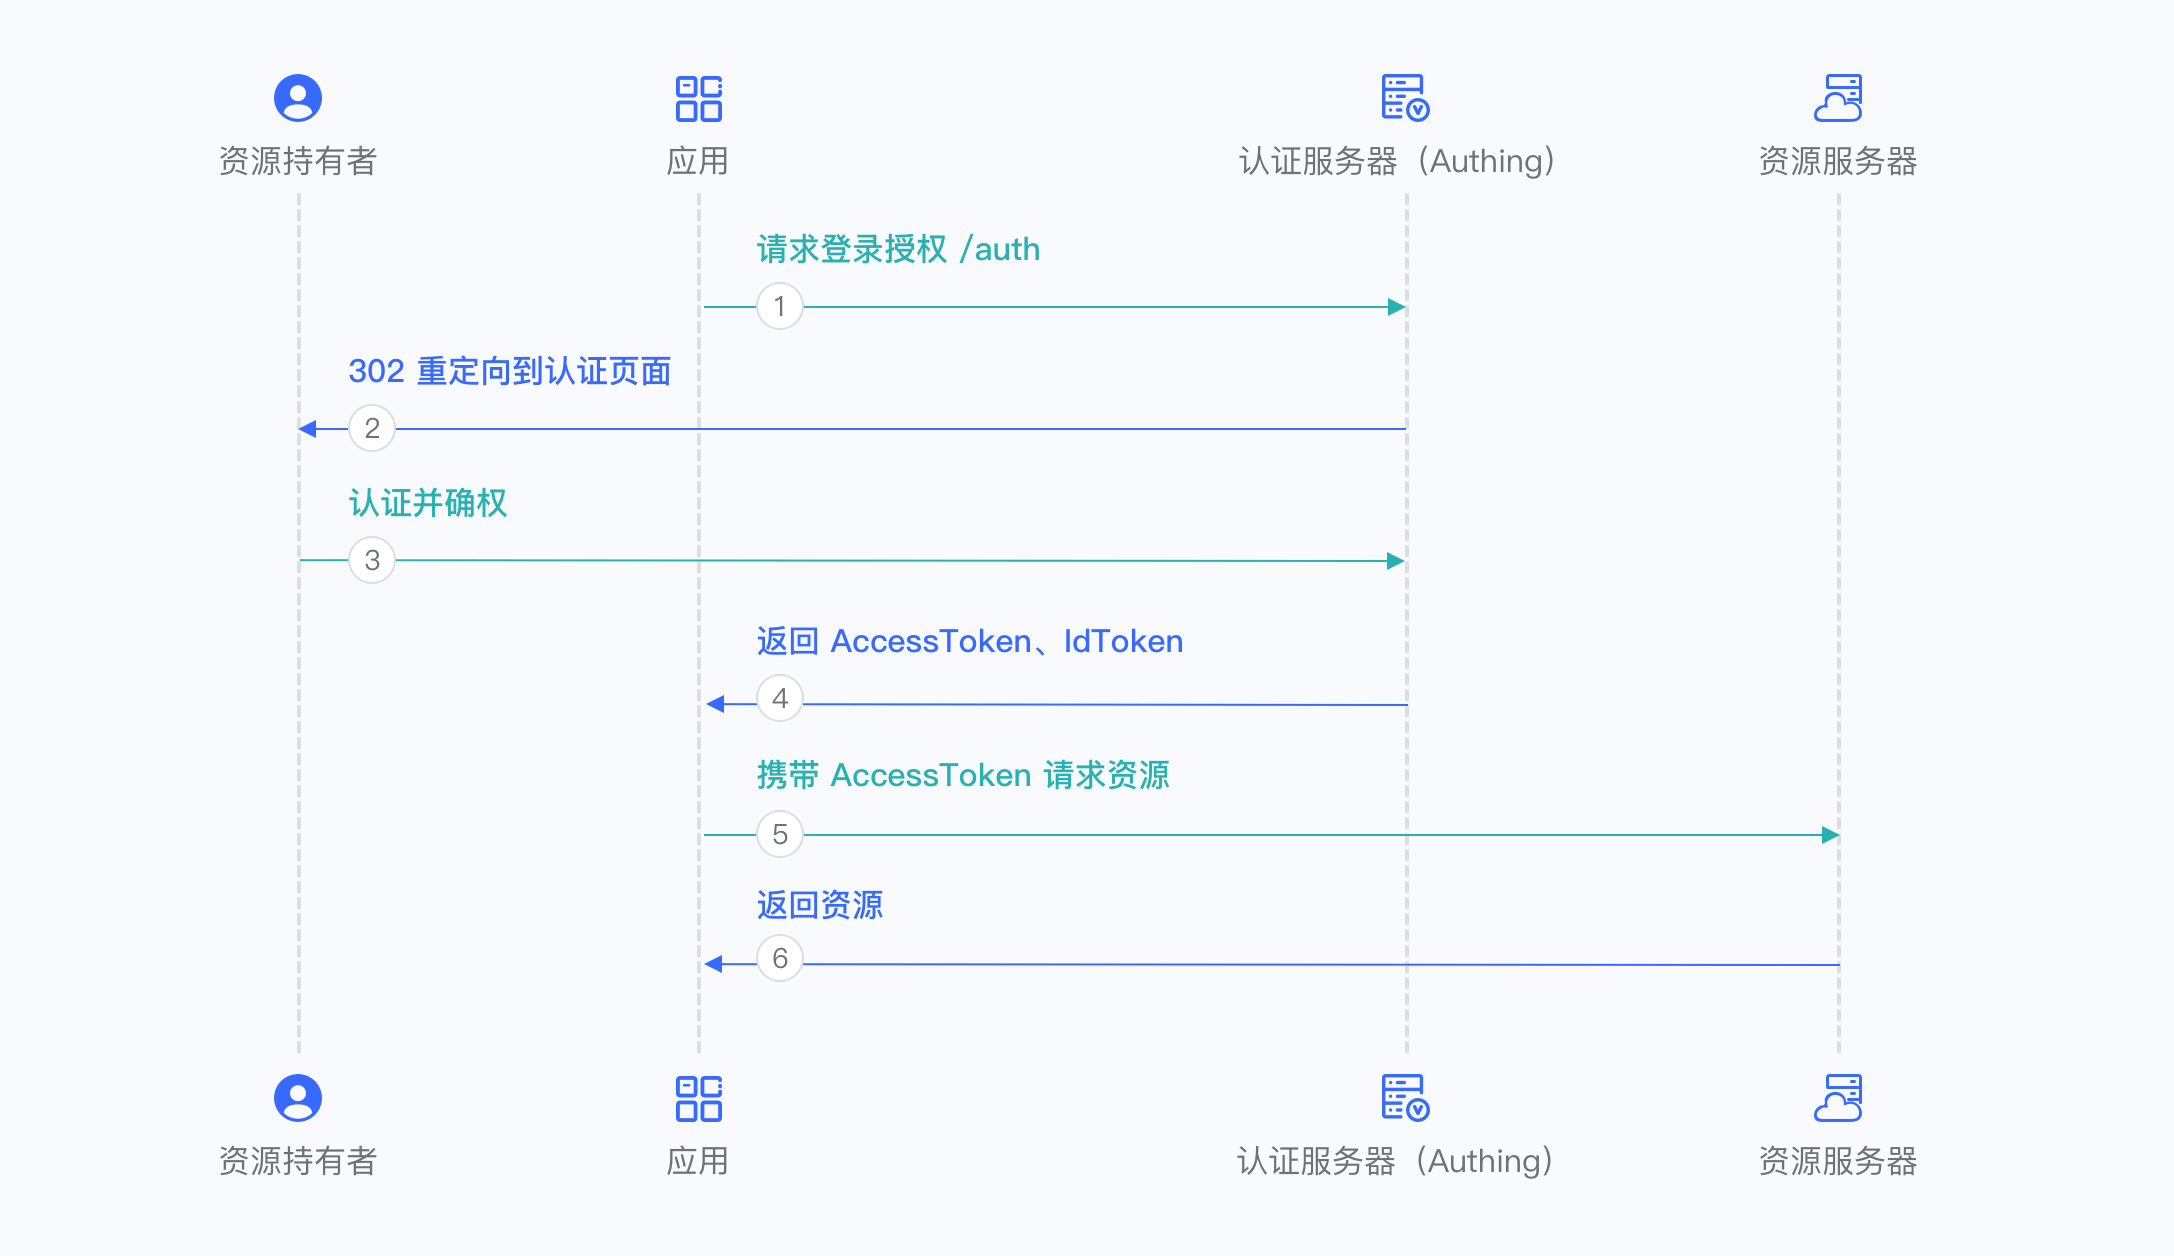
Implicit mode
If your application is a SPA front-end application, you can also use implicit mode to complete user authentication and authorization. Implicit mode is suitable for scenarios where keys cannot be stored securely (such as front-end browsers). In implicit mode, the application does not need to use code to exchange for tokens, and does not need to request the /oidc/token endpoint. AccessToken and IdToken will be returned directly from the authentication endpoint.
The overall process is as follows:
- In your application, let the user visit the login link, the browser jumps to GenAuth, and the user completes authentication in GenAuth.
- The GenAuth server will directly issue the user's AccessToken and IdToken, and send them to your application frontend in the URL hash through browser redirection.
- Your application extracts the AccessToken and IdToken from the URL.
- Your application can save the AccessToken and IdToken for subsequent use, such as accessing the resource server with the AccessToken and requesting the server with the IdToken so that the server can identify the user.
Hybrid mode
In some scenarios, you may want to obtain both the AccessToken and IdToken directly from the authentication endpoint and the authorization code for subsequent refresh token acquisition. It is recommended to use the hybrid mode. In the hybrid mode, the application will receive the AccessToken, IdToken and code. The application can choose to send the code to the backend service to obtain the user's AccessToken, IdToken, and Refresh token from the /oidc/token endpoint.
The overall process is as follows:
In your application, let the user visit the login link, the browser jumps to GenAuth, and the user completes authentication in GenAuth.
The GenAuth server will directly issue a temporary authorization code, as well as the user's AccessToken and IdToken, and send them to your application front end in URL hash through browser redirection.
Your application extracts the code, AccessToken, and IdToken from the URL.
Your application can save the AccessToken and IdToken for subsequent use, such as accessing the resource server with the AccessToken and requesting the server with the IdToken so that the server can identify the user.
Your application can send the code to the backend.
The application backend can use the code to obtain the user's AccessToken, IdToken, and refresh token. After that, you can save user information, use the AccessToken to call other APIs of the resource party, and so on.
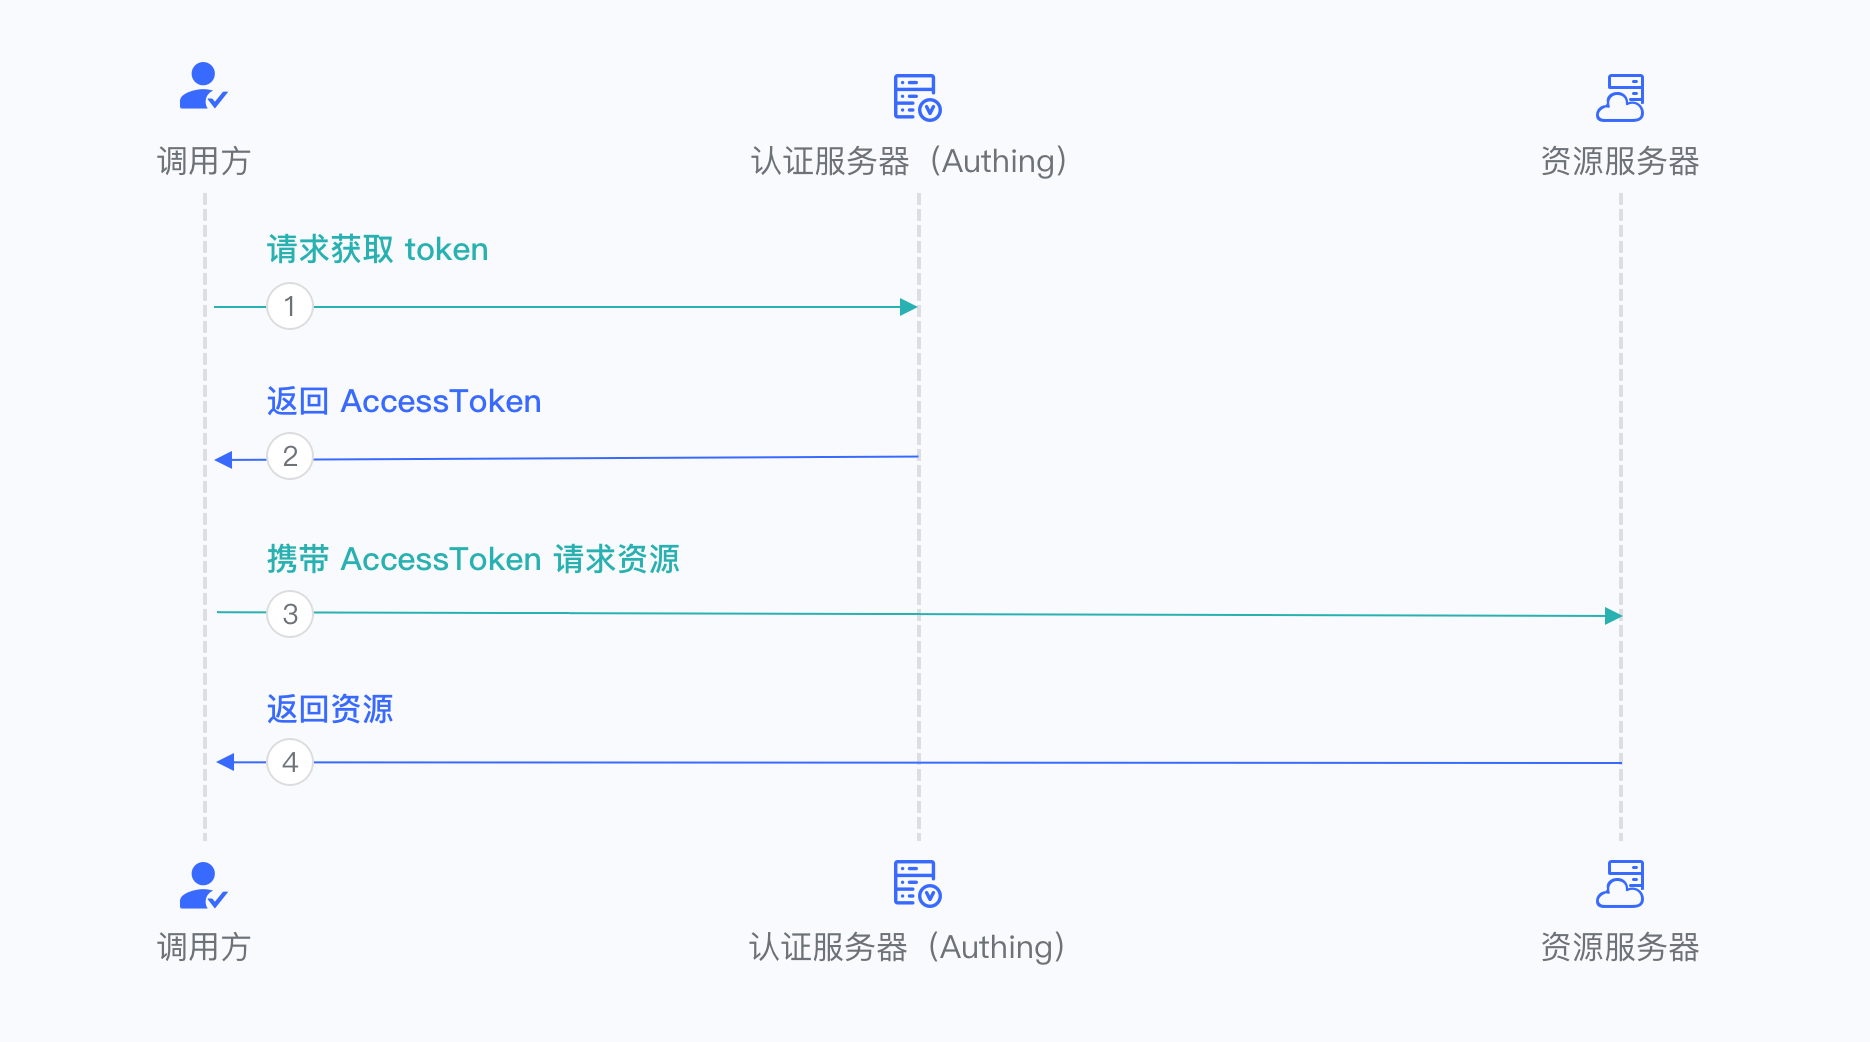
Client Credentials Mode
Client Credentials mode is used for server-to-server authorization (M2M authorization) without user participation. You need to create a programmatic access account and give the AK and SK key pairs to your resource caller.
The overall process is as follows:
The resource caller sends his credentials AK, SK and the requested scope to the GenAuth authorization endpoint.
If the credentials are correct and the caller has resource permissions, GenAuth issues an AccessToken for it.
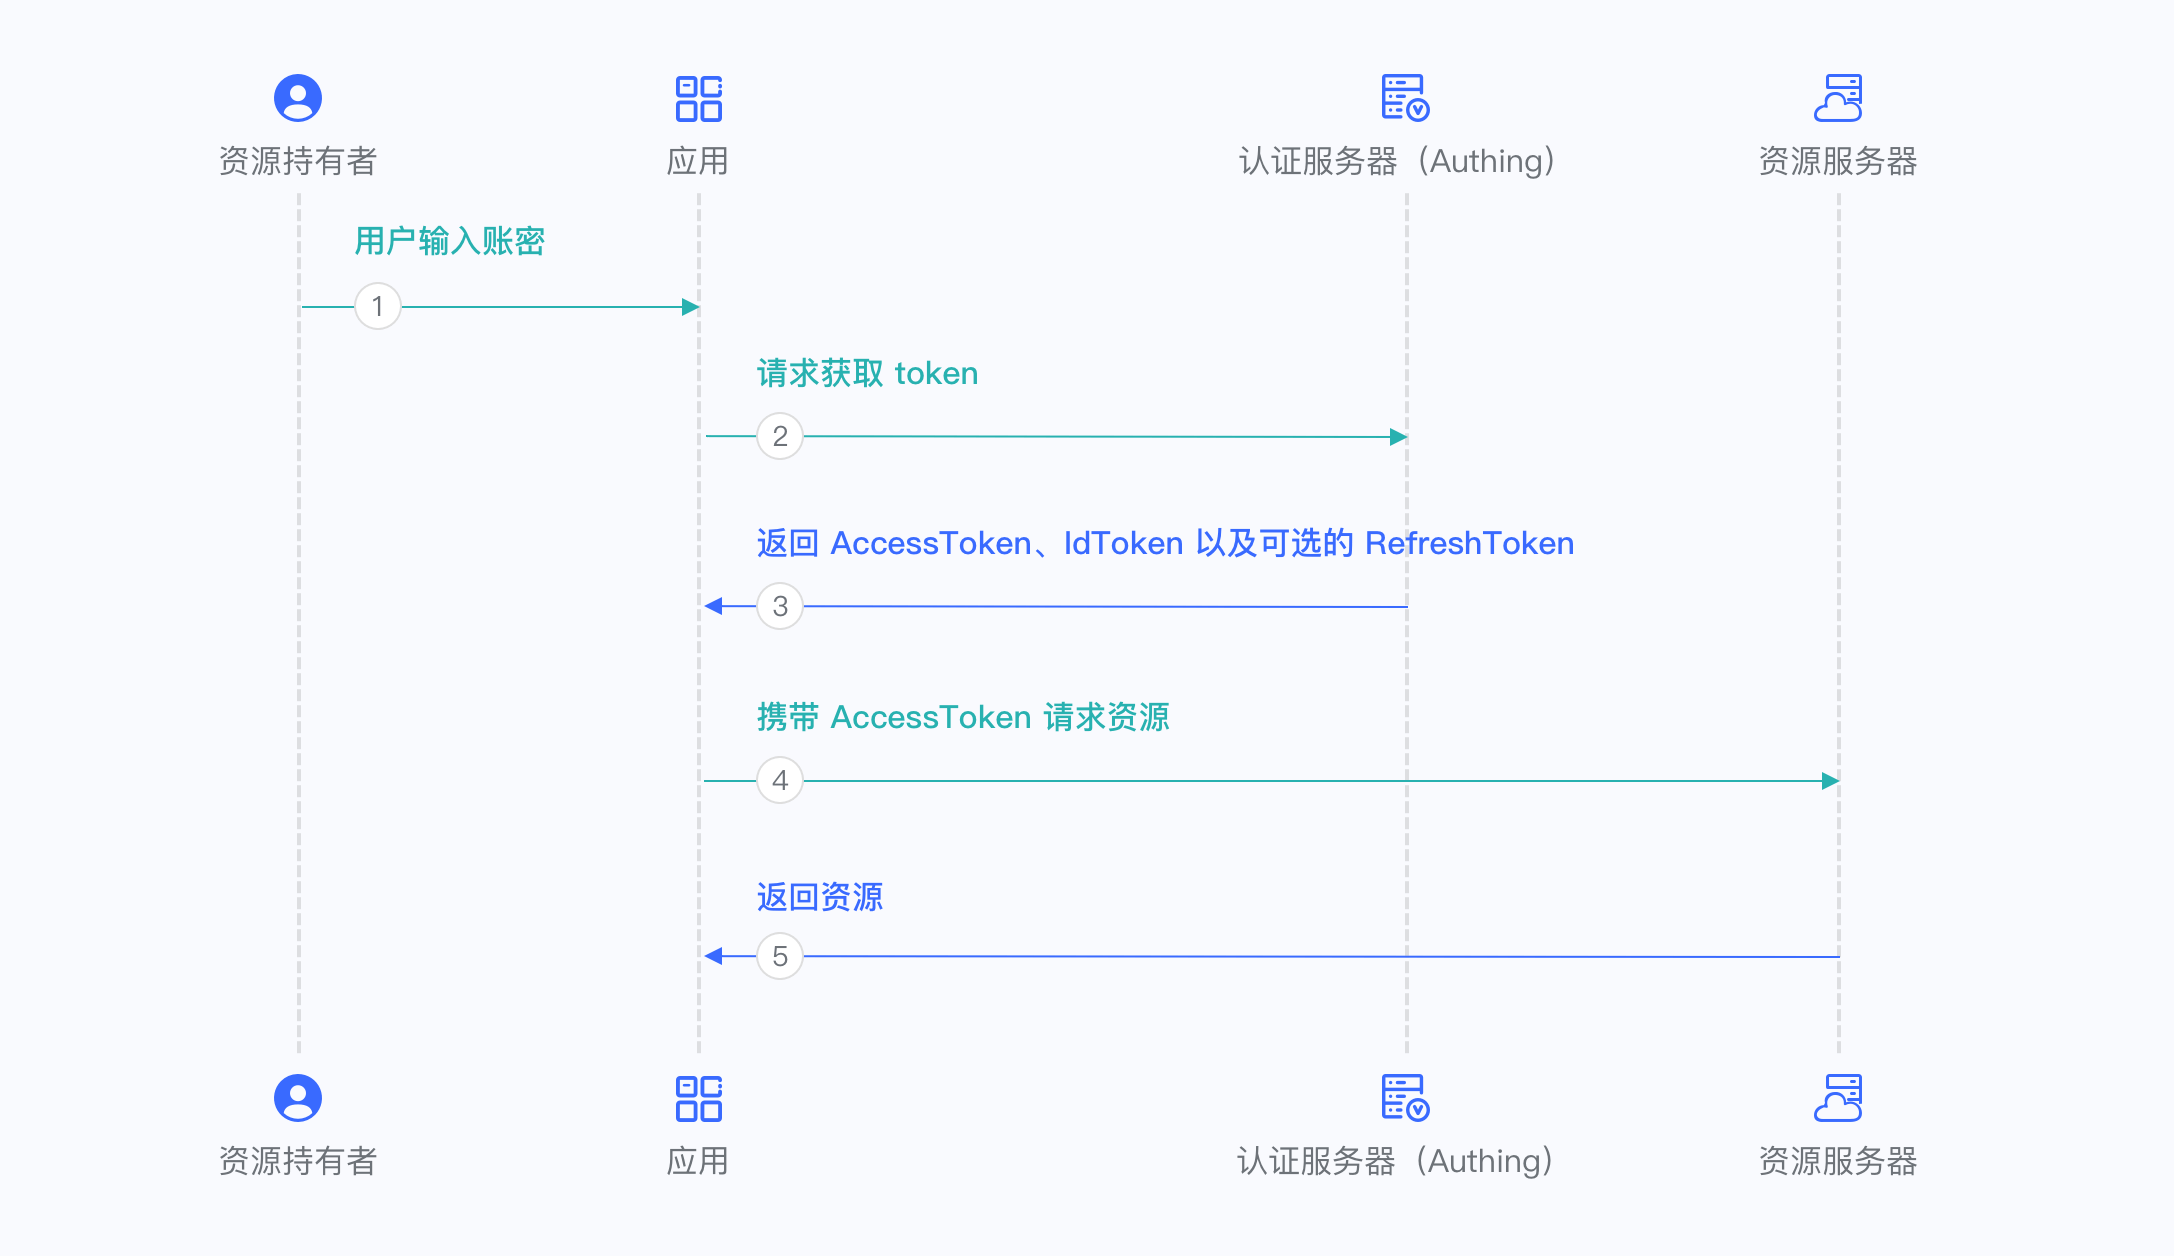
Password mode
This mode is not recommended. Try to use other modes. Only consider using password mode when other modes cannot solve the problem. If you use password mode, please make sure that your application code logic is very secure and will not be attacked by hackers, otherwise it will directly leak the user's account and password. It is generally used to transform and integrate very old applications, otherwise never make it your first choice.
The overall process is as follows:
- Your application asks the user to enter the account and password information.
- Your application sends the user's account and password to GenAuth.
- If the account and password are correct, GenAuth returns a token.
Use code to exchange for token
INFO
Note: refresh_token will only be returned when offline_access is added to scope when initiating an OIDC login request. For details, see Build login address.
Request parameters
| Name | Type | Required | Default value | Description | Sample value |
|---|---|---|---|---|---|
| code | string | Yes | - | The one-time authorization code obtained. A code can only be used once and will be invalid after use. The validity period is 10 minutes. | some-randon-string |
Sample code
import { AuthenticationClient, Models } from "authing-node-sdk";

const authenticationClient = new AuthenticationClient({
  // Need to be replaced with your GenAuth application ID
  appId: "GEN_AUTH_APP_ID",
  // Need to be replaced with your GenAuth application key
  appSecret: "GEN_AUTH_APP_SECRET",
  // Need to be replaced with your GenAuth application domain name
  appHost: "GEN_AUTH_APP_HOST",
  // Need to be replaced with your GenAuth application callback address
  redirectUri: "GEN_AUTH_APP_REDIRECT_URI",
});

(async () => {
  const result = await authenticationClient.getAccessTokenByCode(
    // After the user authentication is completed and the callback is sent to your system, you can get a one-time temporary credential from the query parameter of the callback address
    "REPLACE_ME_WITH_REAL_CODE"
  );
  console.log(JSON.stringify(result, null, 2));
})();
Use refresh_toke to exchange for a new token
INFO
Note: refresh_token will only be returned when offline_access is added to scope when an OIDC login request is initiated.
When access_token expires, refresh_token can be used to exchange for a new access_token, thereby ensuring security and achieving the function of keeping the user logged in for a long time without the user having to log in again.
Request parameters
| Name | Type | Required | Default value | Description | Sample value |
|---|---|---|---|---|---|
| refresh_token | string | Yes | - | refresh_token returned when getting token. | some-randon-string |
Sample code
import { AuthenticationClient, Models } from "authing-node-sdk";

const authenticationClient = new AuthenticationClient({
  // Need to be replaced with your GenAuth application ID
  appId: "GEN_AUTH_APP_ID",
  // Need to be replaced with your GenAuth application key
  appSecret: "GEN_AUTH_APP_SECRET",
  // Need to be replaced with your GenAuth application domain name
  appHost: "GEN_AUTH_APP_HOST",
  // Need to be replaced with your GenAuth application callback address
  redirectUri: "GEN_AUTH_APP_REDIRECT_URI",
});

(async () => {
  const result = await authenticationClient.getAccessTokenByCode(
    // After the user authentication is completed and the callback is sent to your system, you can get the one-time temporary credentials from the query parameter of the callback address
    "REPLACE_ME_WITH_REFRESH_TOKEN"
  );
  console.log(JSON.stringify(result, null, 2));
})();
Request Response
Type: OIDCTokenResponse
| Name | Type | Is it required? | Description | Sample value |
|---|---|---|---|---|
| access_token | string | No | Interface call credentials, authorized to access resource API within a limited time | eyJhbGciOiJSUzI1NiIsInR5cCI6IkpXVCIsImtpZCI6InIxTGtiQm8zOTI1UmIyWkZGckt5VTNNVmV4OVQyODE3S3gwdmJpNmlfS2MifQ.eyJqdGkiOiJ4R01uczd5cmNFckxiakNRVW9US1MiLCJzdWIiOiI1YzlmNzVjN2NjZjg3YjA1YTk yMWU5YjAiLCJpc3MiOiJodHRwczovL2F1dGhpbmcuY24iLCJpYXQiOjE1NTQ1Mzc4NjksImV4cCI6MTU1NDU0MTQ2OS wic2NvcGUiOiJvcGVuaWQgcHJvZmlsZSBvZmZsaW5lX2FjY2VzcyBwaG9uZSBlbWFpbCIsImF1ZCI6IjVjYTc2NWUzOT MxOTRkNTg5MWRiMTkyNyJ9.wX05OAgYuXeYM7zCxhrkvTO_taqxrCTG_L2ImDmQjMml6E3GXjYA9EFK0NfWquUI2mdS MAqohX-ndffN0fa5cChdcMJEm3XS9tt6-_zzhoOojK-q9MHF7huZg4O1587xhSofxs-KS7BeYxEHKn_10tAkjEIo9QtY UE7zD7JXwGUsvfMMjOqEVW6KuY3ZOmIq_ncKlB4jvbdrduxy1pbky_kvzHWlE9El_N5qveQXyuvNZVMSIEpw8_y5iSxPxKfrVwGY7hBaF40Oph-d2PO7AzKvxEVMamzLvMGBMaRAP_WttBPAUSqTU5uMXwMafryhGdIcQVsDPcGNgMX6E1jzLA |
| id_token | string | No | User's identity credentials, which will contain user information after parsing | eyJhbGciOiJSUzI1NiIsInR5cCI6IkpXVCIsImtpZCI6InIxTGtiQm8zOTI1UmIyWkZGckt5VTNNVmV4OVQyODE3S3gw dmJpNmlfS2MifQ.eyJzdWIiOiI1YzlmNzVjN2NjZjg3YjA1YTkyMWU5YjAiLCJub25jZSI6IjIyMTIxIiwiYXRfaGFzaCI 6Ik5kbW9iZVBZOEFFaWQ2T216MzIyOXciLCJzaWQiOiI1ODM2NzllNC1lYWM5LTRjNDEtOGQxMS1jZWFkMmE5OWQzZWIiL CJhdWQiOiI1Y2E3NjVlMzkzMTk0ZDU4OTFkYjE5MjciLCJleHAiOjE1NTQ1NDE0NjksImlhdCI6MTU1NDUzNzg2OSwiaXN zIjoiaHR0cHM6Ly9hdXRoaW5nLmNuIn0.IQi5FRHO756e_eAmdAs3OnFMU7QuP-XtrbwCZC1gJntevYJTltEg1CLkG7eVh di_g5MJV1c0pNZ_xHmwS0R-E4lAXcc1QveYKptnMroKpBWs5mXwoOiqbrjKEmLMaPgRzCOdLiSdoZuQNw_z-gVhFiMNxI0 55TyFJdXTNtExt1O3KmwqanPNUi6XyW43bUl29v_kAvKgiOB28f3I0fB4EsiZjxp1uxHQBaDeBMSPaRVWQJcIjAJ9JLgka Dt1j7HZ2a1daWZ4HPzifDuDfi6_Ob1ZL40tWEC7xdxHlCEWJ4pUIsDjvScdQsez9aV_xMwumw3X4tgUIxFOCNVEvr73Fg |
| refresh_token | string | No | refresh_token is used to obtain a new AccessToken | WPsGJbvpBjqXz6IJIr1UHKyrdVF |
| token_type | string | Yes | token type | xxx |
| expire_in | number | Yes | expiration time in seconds | 7200 |
Sample result:
{
  "statusCode": 200,
  "message": "Operation successful",
  "requestId": "934108e5-9fbf-4d24-8da1-c330328abd6c",
  "data": {
    "token": "openid profile",
    "access_token": "eyJhbGciOiJSUzI1NiIsInR5cCI6IkpXVCIsImtpZCI6InIxTGtiQm8zOTI1UmIyWkZGckt5VTNNVmV4OVQyODE3S3gwdmJpNmlfS2MifQ.eyJqdGkiOiJ4R01uczd5cmNFckxiakNRVW9US1MiLCJzdWIiOiI1YzlmNzVjN2NjZjg3YjA1YTkyMWU5YjAiLCJpc3MiOiJodHRwczovL2F1dGhpbmcuY24iLCJpYXQiOjE1NTQ1Mzc4NjksImV4cCI6MTU1NDU0MTQ2OSwic2NvcGUiOiJvcGVuaWQgcHJvZmlsZSBvZmZsaW5lX2FjY2VzcyBwaG9uZSBlbWFpbCIsImF1ZCI6IjVjYTc2NWUzOTMxOTRkNTg5MWRiMTkyNyJ9.wX05OAgYuXeYM7zCxhrkvTO_taqxrCTG_L2ImDmQjMml6E3GXjYA9EFK0NfWquUI2mdSMAqohX-ndffN0fa5cChdcMJEm3XS9tt6-_zzhoOojK-q9MHF7huZg4O1587xhSofxs-KS7BeYxEHKn_10tAkjEIo9QtYUE7zD7JXwGUsvfMMjOqEVW6KuY3ZOmIq_ncKlB4jvbdrduxy1pbky_kvzHWlE9El_N5qveQXyuvNZVMSIEpw8_y5iSxPxKfrVwGY7hBaF40Oph-d2PO7AzKvxEVMamzLvMGBMaRAP_WttBPAUSqTU5uMXwMafryhGdIcQVsDPcGNgMX6E1jzLA",
    "id_token": "eyJhbGciOiJSUzI1NiIsInR5cCI6IkpXVCIsImtpZCI6InIxTGtiQm8zOTI1UmIyWkZGckt5VTNNVmV4OVQyODE3S3gwdmJpNmlfS2MifQ.eyJzdWIiOiI1YzlmNzVjN2NjZjg3YjA1YTkyMWU5YjAiLCJub25jZSI6IjIyMTIxIiwiYXRfaGFzaCI6Ik5kbW9iZVBZOEFFaWQ2T216MzIyOXciLCJzaWQiOiI1ODM2NzllNC1lYWM5LTRjNDEtOGQxMS1jZWFkMmE5OWQzZWIiLCJhdWQiOiI1Y2E3NjVlMzkzMTk0ZDU4OTFkYjE5MjciLCJleHAiOjE1NTQ1NDE0NjksImlhdCI6MTU1NDUzNzg2OSwiaXNzIjoiaHR0cHM6Ly9hdXRoaW5nLmNuIn0.IQi5FRHO756e_eAmdAs3OnFMU7QuP-XtrbwCZC1gJntevYJTltEg1CLkG7eVhdi_g5MJV1c0pNZ_xHmwS0R-E4lAXcc1QveYKptnMroKpBWs5mXwoOiqbrjKEmLMaPgRzCOdLiSdoZuQNw_z-gVhFiMNxI055TyFJdXTNtExt1O3KmwqanPNUi6XyW43bUl29v_kAvKgiOB28f3I0fB4EsiZjxp1uxHQBaDeBMSPaRVWQJcIjAJ9JLgkaDt1j7HZ2a1daWZ4HPzifDuDfi6_Ob1ZL40tWEC7xdxHlCEWJ4pUIsDjvScdQsez9aV_xMwumw3X4tgUIxFOCNVEvr73Fg",
    "refresh_token": "WPsGJbvpBjqXz6IJIr1UHKyrdVF",
    "token_type": "xxx",
    "expire_in": 7200
  }
}